Follow Me On Social Media!

Magic Crust Custard Pie (Self-Crusting Blender Dessert, 45 Min)
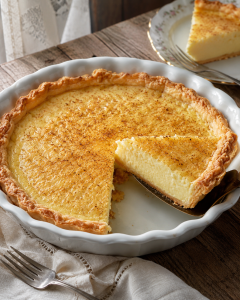
This magic crust custard pie is the easiest blender dessert ever, forming its own tender bottom layer and silky vanilla-nutmeg custard as it bakes.

The first time I pulled a magic crust custard pie out of my oven, I actually laughed out loud in my kitchen because it felt like some kind of edible sleight of hand. You blend one thin, milky batter, pour it into a buttered pie plate, walk away for forty-five minutes, and somehow it comes back to you as a layered dessert with a soft, cake-like base and a creamy vanilla custard center. There is no dough to roll, no blind baking, no fussy tempering of eggs, and no special equipment beyond a blender and a pie dish. It is the kind of old-fashioned, pantry-friendly recipe I keep coming back to when I want something homemade and comforting without giving up my whole afternoon.
Fun fact: this style of self-crusting pie became a huge hit in American home kitchens during the 1970s, when Bisquick published its famous “Impossible Pie” recipes and cooks discovered that flour, eggs, and milk could quietly separate into distinct layers all on their own during baking.
Why this recipe works
- The batter blends together in under a minute, so cleanup is basically one blender jar and a spatula.
- Flour naturally settles toward the bottom of the pie plate, which forms that gentle, tender “crust” while the eggs and milk stay silky above it.
- Everyday ingredients like eggs, milk, sugar, butter, and vanilla mean I can bake this on a whim without a grocery run.
- The sweetness is soft and old-fashioned, so the vanilla and nutmeg get to shine instead of being hidden under sugar.
- It tastes lovely warm and even better cold from the fridge the next morning with coffee.
Ingredients
- ¼ cup butter (or margarine), softened or melted and slightly cooled
- 4 large eggs
- ¾ cup granulated sugar
- 1 generous pinch of salt
- 2 cups 2% or whole milk
- 2 teaspoons pure vanilla extract
- ½ cup all-purpose flour
- Ground or freshly grated nutmeg, for dusting the top
Instructions
Step 1: Heat the oven and prep the pan
Preheat your oven to 350°F. Grab a 9-inch pie plate and butter it generously along both the bottom and the sides. This little bit of grease is what helps the finished custard release cleanly, so do not be shy with it.
Step 2: Blend the batter
Add the butter, eggs, sugar, salt, milk, vanilla, and flour to your blender in that order. Secure the lid and blend for about 20 to 30 seconds, just long enough for everything to look smooth and completely uniform. The batter will look shockingly thin, almost like flavored milk. Trust me here and resist the urge to add more flour, because that thinness is exactly what allows the pie to form its magical layers.
Step 3: Pour into the pie plate
Carefully pour the batter into your buttered pie dish. If the sloshy consistency makes you nervous about carrying it to the oven, set the empty pie plate on a rimmed baking sheet before you fill it. That way you have a stable tray to lift instead of trying to balance a very liquid pie in your hands.
Step 4: Dust with nutmeg
Sprinkle a light, even layer of nutmeg across the surface. You are not trying to coat it, just perfume it. Freshly grated nutmeg smells incredible here, but the jar of pre-ground works beautifully too. If nutmeg is not your thing, a light dusting of cinnamon is a nice alternative.
Step 5: Bake until just set
Slide the pie into the oven and bake at 350°F for 40 to 45 minutes. Try to keep the oven door closed during the first half of baking so the custard sets evenly. You will know it is done when the edges look firm, the top is a soft golden color, and the very center still has a gentle jiggle without appearing wet or sloshy. Custard keeps setting as it cools, so pulling it a touch early is much better than overbaking it into a rubbery texture.
Step 6: Cool, then slice
Transfer the pie to a wire rack and let it rest for at least 30 to 40 minutes before slicing. The filling continues to firm up as it sits, so a little patience pays off in cleaner wedges. For truly picture-perfect slices, chill the pie in the fridge for a few hours. If you cannot wait, warm slices are absolutely delicious too, just slightly softer on the plate.
Nutrition information
- Calories: 245 per slice (based on 8 slices)
- Carbohydrates: 30 g
- Protein: 7 g
- Fat: 10 g
- Saturated Fat: 5 g
- Sugar: 22 g
- Sodium: 110 mg
Pro tips for the best magic crust custard pie
- Bring the eggs and milk to room temperature before blending so the custard bakes more evenly and avoids a grainy texture.
- Use a good-quality pure vanilla extract, because with so few flavors in the batter, its aroma really carries the whole pie.
- For a richer, silkier filling, swap ½ cup of the milk for heavy cream while keeping the rest whole milk.
- Bake on the center rack, and if your oven runs hot, check the pie at the 35-minute mark to protect that gentle wobble.
Frequently asked questions
Can I make this pie ahead of time?
Yes, and honestly it is even better the next day. Bake it, let it cool to room temperature, then cover and refrigerate for up to 3 days. The custard slices beautifully once fully chilled.
Why is my custard pie watery in the middle?
A watery center almost always means it needed a few more minutes in the oven. The edges should be set and the middle should jiggle gently, not slosh. If it looks liquid, tent it loosely with foil and give it another 5 to 8 minutes.
Can I use non-dairy milk?
You can, though the texture will be a little different. Full-fat oat milk or canned coconut milk work best because they have enough body to mimic whole milk. Skim almond milk tends to bake up thinner and less creamy.
Do I really need a blender?
No, a whisk and a large bowl work in a pinch. Whisk the eggs, sugar, salt, and vanilla together first, then add the melted butter, milk, and flour and whisk until completely smooth with no flour lumps.
How should I store leftovers?
Cover the pie tightly or transfer slices to an airtight container and refrigerate for up to 3 days. I do not recommend freezing it, because custard tends to weep and turn watery once it thaws.