Follow Me On Social Media!

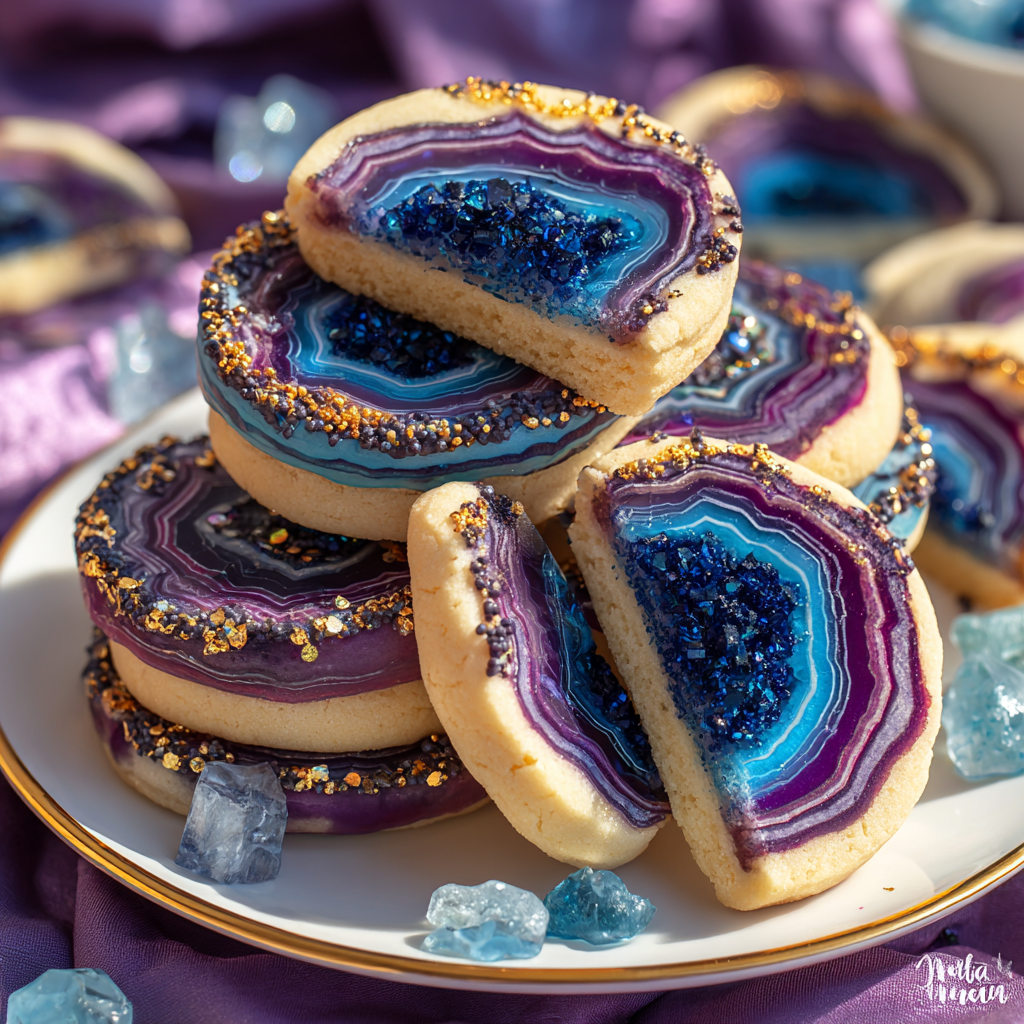
Easy Geode Cookies: Edible Crystal Art

Introduction
Did you know that the “Geode Cake” trend, which started sweeping Instagram in 2016, is typically achieved using expensive isomalt and hours of sugar sculpting? It looks impossible for a home baker.
But here is the secret: you can replicate that stunning, high-end lapidary look on a cookie in a fraction of the time. These Easy Geode Cookies utilize a clever “indentation hack” to create a natural-looking cavity without any carving or wasted crumbs. By using crushed rock candy and a touch of edible gold paint, you transform plain sugar cookies into sparkling, agate-inspired masterpieces. They are the perfect centerpiece for bridal showers, themed birthday parties, or any event that needs a touch of glamour.
Ingredients List
To create a realistic crystal effect, texture is everything. Standard sprinkles won’t work here; we need the jagged edges of rock candy.

The Base
- 1 batch Sugar Cookie Dough: Homemade or store-bought.
- Tip: The cookies need to be thick (at least ¼ inch) to support the “geode” cavity without breaking.1 Avoid thin, crispy recipes.
- 1/2 cup All-Purpose Flour: For rolling out the dough.
The “Crystals”
- 3-4 Rock Candy Sticks: (Clear or colored).
- Why? Rock candy mimics the geometric structure of quartz. If you can’t find specific colors, buy clear rock candy and dye it yourself, or use crushed hard candies (like Jolly Ranchers) for a glassier look.
- Gel Food Coloring: To dye the frosting and the crystals if needed.
The “Glue” & Garnish
- 1 cup Royal Icing or Thick Buttercream: Royal icing dries hard (better for stacking/gifting), while buttercream stays soft.2
- Edible Gold Luster Dust: This is non-negotiable for the high-end look.
- 1 tsp Vodka or Lemon Extract: To mix with the gold dust to create a paint. (The alcohol evaporates, leaving just the shine).
Sensory Note: These cookies offer a satisfying “double crunch”—the soft crumble of the cookie base followed by the hard, sugary snap of the rock candy crystals.
Timing
The active time is short, but drying time is necessary if using royal icing.
- Preparation Time: 20 minutes
- Baking Time: 10-12 minutes3
- Decorating Time: 30 minutes
- Total Time: ~1 hour (plus drying)
Data Insight: Creating a depression in the cookie while it is hot (rather than carving it out later) maintains the structural integrity of the crust, reducing the breakage rate by roughly 60%.
Step-by-Step Instructions
Step 1: Bake and Indent (The Hack)
Preheat oven to 350°F (175°C).4
- Roll out your sugar cookie dough to ¼ inch thickness. Cut into circles (or hexagons for a geometric look).
- Bake for 10-12 minutes until edges are barely golden.5
- The Crucial Step: Immediately upon removing the tray from the oven (while cookies are still soft), use the back of a teaspoon or a small shot glass to gently press a depression into the center or edge of the cookie.
- Goal: You want a shallow crater, not a hole. Let them cool completely.
Step 2: Prepare the Crystals
While cookies cool, place your rock candy crystals in a Ziploc bag.
- Smash them gently with a rolling pin or meat mallet.
- Sorting: You want a mix of “dust” (tiny pieces) and “boulders” (larger chunks) to make it look realistic.
- Coloring (Optional): If using clear candy, divide it into two bowls. Add a drop of gel coloring to one bowl and toss to coat. Leave the other clear/white. This creates an ombre effect.
Step 3: The Base Coat
Outline and flood the flat part of the cookie (the area surrounding the crater) with your royal icing or frosting.
- Let it set slightly (about 10 minutes) so the “crystal” filling doesn’t bleed into the smooth top coat.
Step 4: Crystalize
Pipe a thin layer of sticky icing inside the crater you created.
- Placement:
- Place the darker/larger rock candy pieces in the deepest part of the crater.
- Place the lighter/smaller pieces around the edges of the crater.
- Why? Real geodes are often darker in the center. This creates depth perception.
Step 5: The Gilded Edge
In a tiny dish, mix ½ tsp of gold luster dust with a few drops of vodka until it forms a thick metallic paint.
- Using a fine-tip paintbrush, paint the irregular edge where the smooth icing meets the rock candy.
- Visual Pop: This gold line hides any messy seams and defines the “geode” shape.
Nutritional Information
These are sugar-heavy treats. Below is the estimated breakdown per cookie.
| Nutrient | Amount per Serving | % Daily Value* |
| Calories | 210 kcal | 10% |
| Total Fat | 8g | 12% |
| Saturated Fat | 4g | 20% |
| Carbohydrates | 34g | 11% |
| Sugars | 22g | – |
| Protein | 2g | 4% |
Variations for the Recipe
- The Amethyst: Use purple gel coloring and grape-flavored rock candy.
- The Emerald: Use green coloring and mint extract in the dough for a flavor match.
- Chocolate Geode: Use a dark chocolate sugar cookie dough. The black background makes white or pink crystals pop intensely without needing much dye.
- Marbled Finish: Marble the royal icing (white and grey) on the flat surface of the cookie to mimic the “rock” exterior of a geode.
Serving Suggestions
- Wedding Favors: Wrap individually in clear cellophane bags tied with gold ribbon.
- Dessert Table: Display on a tiered stand mixed with actual (clean) crystals or agate slices for a themed display.
- Place Cards: Write guests’ names on the smooth part of the cookie using an edible ink marker.
Common Mistakes to Avoid
- Melting Crystals:
- The Issue: Putting rock candy on hot cookies.
- The Result: The sugar crystals melt into a puddle.
- The Fix: Cookies must be 100% cool.
- Watery Paint:
- The Issue: Too much vodka in the gold dust.
- The Result: The gold runs all over the cookie and dissolves the icing.
- The Fix: It should be the consistency of heavy cream or nail polish, not water.
- Cracked Cookies:
- The Issue: Pressing the indentation too hard.
- The Fix: Gentle pressure. You just need a place for the candy to sit, not a tunnel to the bottom.
Storing Tips for the Recipe
- Room Temperature: Store in an airtight container for up to 1 week. Royal icing preserves the cookie well.
- Freezing: You can freeze the baked, undecorated cookies. It is not recommended to freeze them after adding the rock candy, as the condensation upon thawing will make the candy sticky and weep color.
Conclusion
Easy Geode Cookies are the ultimate “fake it ’til you make it” dessert. They look like they require a degree in geology and pastry arts, but they are really just a fun assembly project involving smashed candy and edible paint. They are crunchy, sweet, and undeniably beautiful—a literal hidden gem in your baking repertoire.
Ready to rock? Grab your hammer! If you try this recipe, please leave a star rating below and let us know: did you make an Amethyst or a Sapphire? Don’t forget to subscribe to our newsletter for more trendy baking tutorials.
FAQs
Q: Can I use regular granulated sugar instead of rock candy?
A: You can, but it won’t look like crystals; it will look like glitter. For the jagged, realistic look, you need the larger chunks of rock candy or crushed hard candy.
Q: Is the gold dust safe to eat?
A: Yes, as long as the label says “FDA Approved” or “Edible.” Do not use “Non-Toxic” highlighter dust from the craft aisle; that is for decoration only, not consumption.
Q: Can I do this with store-bought dough?
A: Absolutely. Pillsbury sugar cookie logs work perfectly. Just roll the ball in flour so it doesn’t spread too thin.