- Time needed
- 9 hrs
- Made this
- 0 crocheters
- Skill level
- Intermediate
- Hook size
- 3.5 mm
- Finished size
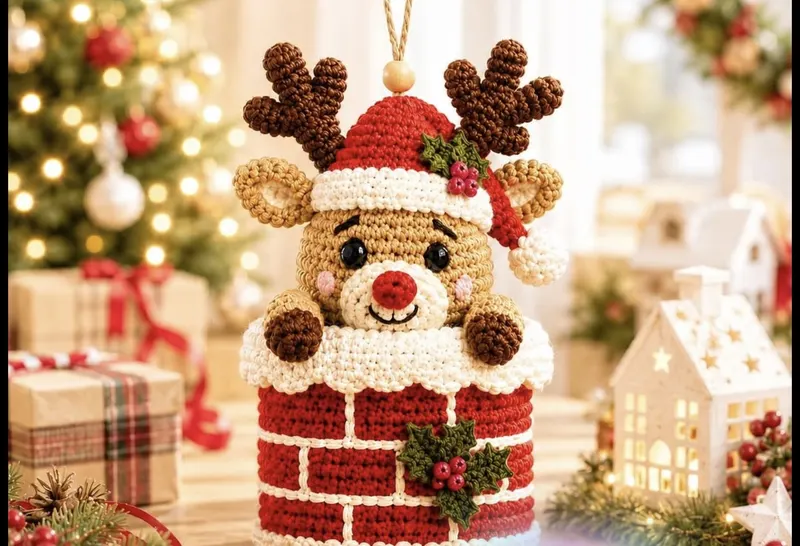
- Approx. 8.5 in (22 cm) tall including antlers and 5 in (13 cm) wide at the snow rim
On this page
- Skill level
Intermediate
Comfortable with shaping, joining and reading counts.
- Time
9 hrs
An average pace, including assembly.
- Use
Christmas Decoration
Approx. 8.5 in (22 cm) tall including antlers and 5 in (13 cm) wide at the snow rim
Why you'll love it
- The peeking reindeer and brick chimney tell a fun little Christmas story.
- Joined rounds and surface slip stitches make neat, realistic brick lines.
- A cardboard base helps it stand flat on a shelf or table.
- Pipe cleaners in the antlers let you pose them just the way you like.
- It can hang from a door handle or stand as a centerpiece.
Materials needed
Tools
- 3.5 mm (US E-4) crochet hook
- Tapestry needle
- Scissors
- Stitch markers
- Two 10 mm black safety eyes
- Polyester fiberfill, approx. 2.5 oz (70 g)
- A 4.5 in (11.5 cm) circle of stiff cardboard or plastic canvas for the base
- Two brown pipe cleaners for the antlers
- 10 in (25 cm) of jute or cotton cord and one 16 mm wooden bead for hanging
- Pins for positioning pieces
Gauge & finished measurements
Gauge: 20 sc and 22 rounds = 4 in (10 cm) in worsted cotton with a 3.5 mm hook. Base gauge: Rounds 1-12 of the chimney measure about 4.6 in (11.5 cm) across. Tight, even stitches matter more than exact gauge.
Row counter
Row 0
Tap the circle after each row
The pattern
Chimney Base
Brick Walls
Chimney Top
Snow Collar
Reindeer Head
Muzzle and Nose
Ears, Antlers and Paws
Santa Hat, Pompom and Holly
Assembly
- 1
Face: sew the muzzle centered below the eyes, between Rounds 14 and 19, adding a little stuffing before closing. Sew the nose to the top of the muzzle. Embroider short eyebrows above each eye with dark brown and add pink cheeks with satin stitch or blush.
- 2
Ears: sew one ear to each side of the head between Rounds 6 and 9, angled outward.
- 3
Antlers: sew the antlers to the top of the head between Rounds 4 and 6, about 10 stitches apart, and bend them into shape.
- 4
Head: place the head on the domed chimney top, tilted slightly forward. Sew the lower part of the head (around Rounds 24-26) firmly to the chimney top with the head tail, working all the way around.
- 5
Paws: place the paws on the front of the snow collar on each side of the muzzle, with the brown pads facing forward and the flat tops tucked against the head. Sew them to the collar and the head.
- 6
Hat: place the hat on the head between the antlers, slightly to the left of center, and sew around the inside of the brim. Let the tip fall to the right and tack it to the side of the head. Sew the pompom to the tip.
- 7
Holly: sew 2 leaves and 3 berries to the left side of the hat brim. Sew 3 leaves and 3 berries as a cluster on the front of the chimney, over the second brick course.
- 8
Hanging loop: thread the cord through the wooden bead, fold it in half, and sew both cord ends securely to the top of the head just behind the hat. Knot the cord above the bead.
Important notes
- Tip: This is an original pattern inspired by the photo. Hidden construction details, yarn weight, and dimensions are interpreted from the image, and the pattern has not been physically test-crocheted.
- Tip: Abbreviations (US terms): ch = chain, sc = single crochet, hdc = half double crochet, dc = double crochet, sl st = slip stitch, MR = magic ring, BLO = back loop only, dec = decrease (invisible single crochet decrease).
- Tip: The chimney is worked in joined rounds; the ch 1 at the start of each round does not count as a stitch. All reindeer pieces are worked in continuous rounds with a stitch marker.
- Tip: Stuff the chimney and head firmly so the piece holds its shape and the head does not tilt.
- Tip: Safety: this is a decoration, not a toy. The safety eyes, pipe cleaners, cardboard base, wooden bead, and small parts are not suitable for babies, young children, or pets.
Pattern FAQ
Can I turn it into a treat container?
Yes. Leave out Rounds 35-40 so the chimney stays open, and skip the cardboard and stuffing. Crochet a separate flat lid using Rounds 1-12 of the base, sew the head and paws to the lid, and work the snow collar around the lid's edge instead.
Why are my mortar lines uneven?
Make sure you work joined rounds and keep every join in the same column. Count from the join column when placing the vertical lines, and keep the surface slip stitches loose so they do not pucker the bricks.
Can I skip the pipe cleaners?
Yes. Stuff the antlers firmly with fiberfill instead. They will be softer and less posable, but safer if the piece might be handled often.
Can I use acrylic yarn?
Yes. Acrylic is softer and slightly fuzzier, while cotton shows the brick lines more crisply. Use a hook that gives a tight fabric so the stuffing does not show.
How do I clean it?
Because of the cardboard base and pipe cleaners, spot clean with a damp cloth and mild soap, then let it air dry. Do not machine wash.
Ratings & reviews
No reviews yet. Made it? Be the first to share how it went.
I made this!
Finished your Reindeer in a Chimney Decoration? Share a photo and it may be featured in our Made-by-You gallery.
Reindeer Chimney Amigurumi Crochet Pattern, © 2026 Mandy’s Crochet Studio. Source: https://mandyshealthylife.com/patterns/reindeer-chimney-christmas-decoration-crochet-pattern/. Please do not redistribute this pattern.