Follow Me On Social Media!

Stacked Buckeye Bars (Fudgy Brownie & Peanut Butter Layers)
Introduction
If you grew up in the Midwest, you know the power of the Buckeye: a peanut butter ball dipped in chocolate to resemble the nut of the Ohio state tree.
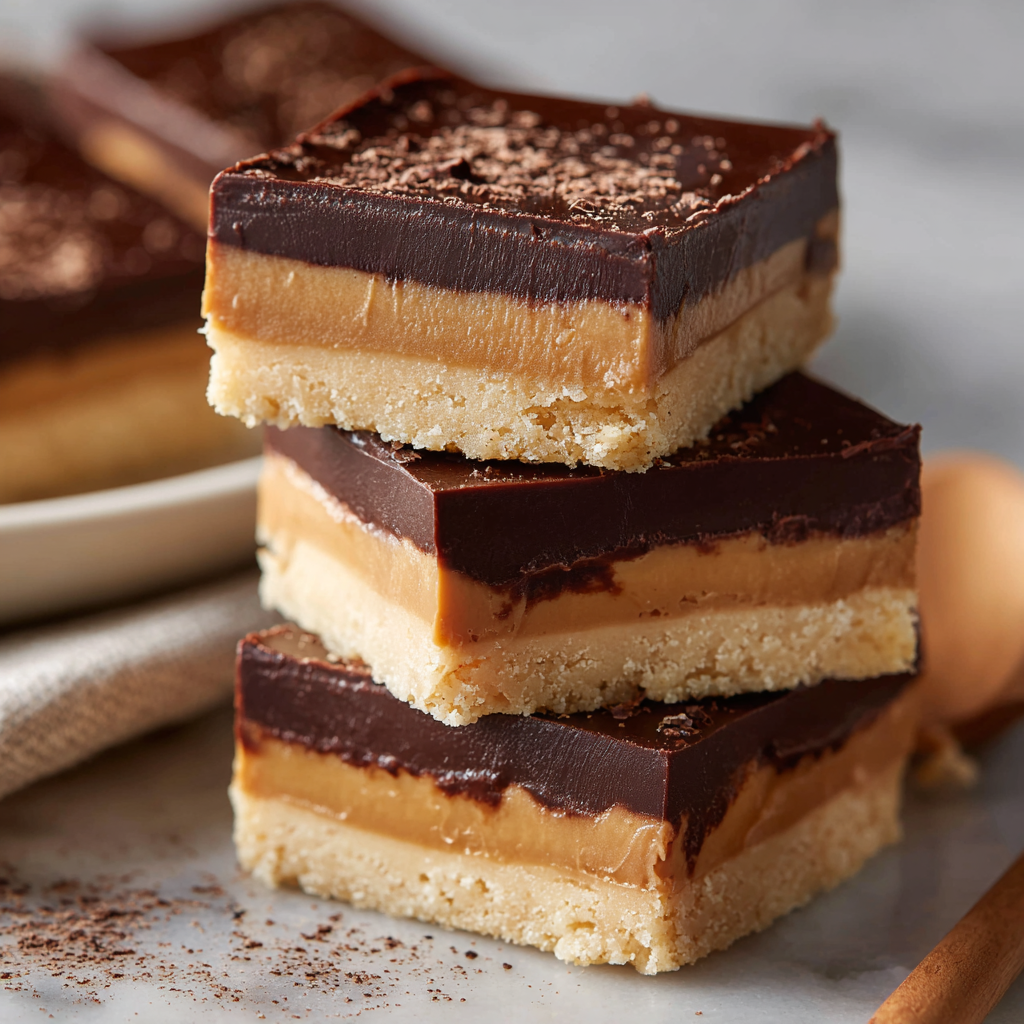
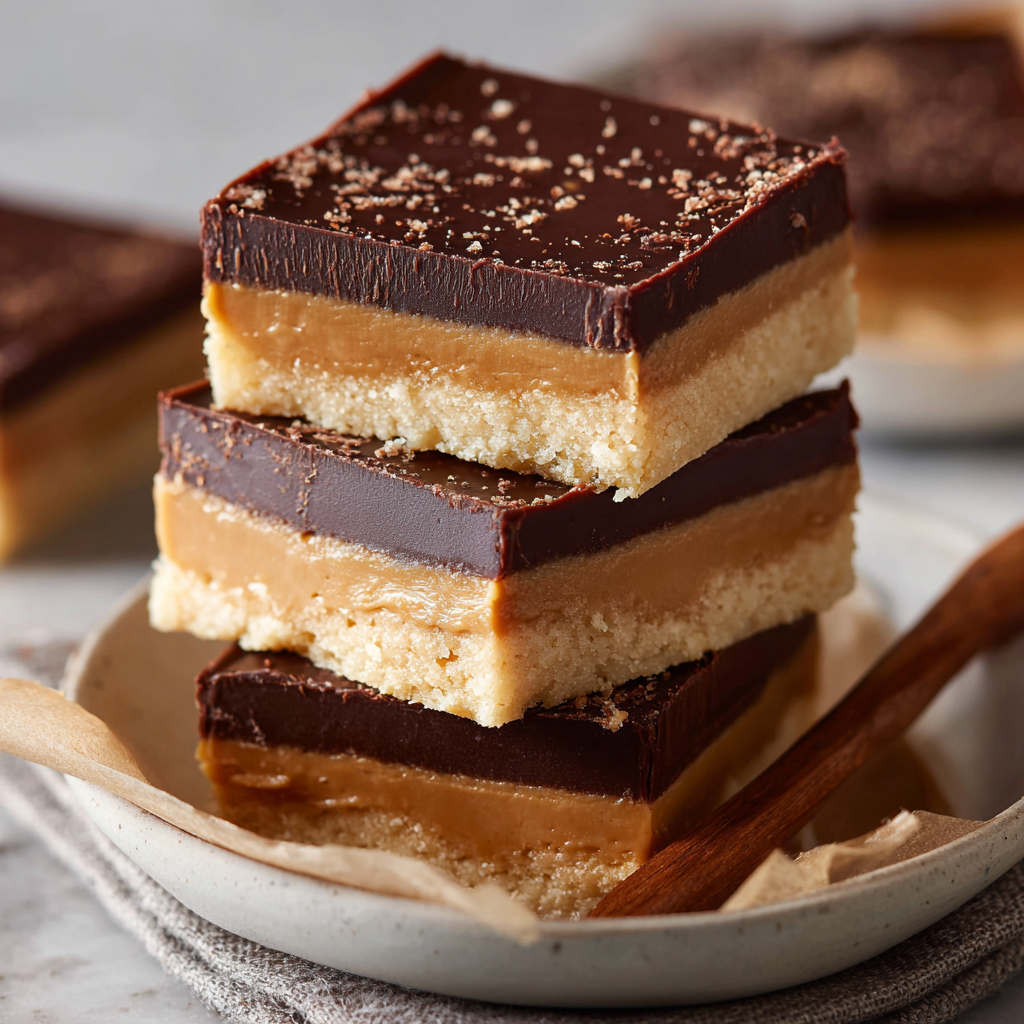
Stacked Buckeye Bars take that nostalgia and turn it into a high-rise dessert architecture. Instead of the tedious process of rolling and dipping individual balls, we construct three distinct layers of happiness: a dense, chewy fudge brownie base, a thick “buckeye” peanut butter dough center, and a glossy semi-sweet chocolate ganache on top.
This is the ultimate dessert for the undecided. It’s part brownie, part fudge, and part candy bar. It is rich, heavy, and absolutely requires a glass of cold milk.
Ingredients List
We are building this bar in three stages.
Layer 1: The Fudgy Brownie Base
- ½ cup (1 stick) Unsalted Butter: Melted.
- 1 cup Granulated Sugar.
- 2 Large Eggs: Room temperature.
- 1 tsp Vanilla Extract.
- 1/3 cup Unsweetened Cocoa Powder: Dutch-process gives a darker look.
- ½ cup All-Purpose Flour.
- ¼ tsp Salt.
- Shortcut: You can use a standard 9×9 box brownie mix if you are pressed for time.
Layer 2: The Buckeye Filling
- 1 ½ cups Creamy Peanut Butter: (e.g., Jif or Skippy).
- Important: Do not use “Natural” peanut butter that requires stirring. The oil separation will prevent the filling from setting properly. You need the emulsifiers in commercial PB.
- ½ cup (1 stick) Unsalted Butter: Softened to room temperature.
- 2 ½ cups Powdered Sugar: Sifted.
- Texture Note: This high ratio of sugar creates a dough that can be handled and smoothed, rather than a sticky spread.
- 1 tsp Vanilla Extract.
Layer 3: The Chocolate Shell
- 1 ½ cups Semi-Sweet Chocolate Chips.
- ½ cup Heavy Cream (or 4 tbsp Butter):
- The Difference: Heavy cream makes a soft Ganache (truffle-like bite). Butter makes a shiny Glaze (snappy bite). Both are delicious.
Sensory Note: The brownie is chewy, the peanut butter layer is creamy and sweet, and the chocolate topping provides the necessary bitterness to balance the sugar.
Timing
This is a “Hurry Up and Wait” recipe. The cooling times are non-negotiable.
- Bake Time: 25 minutes
- Chill Time: 2 hours (divided)
- Assembly: 20 minutes
- Total Time: ~3 hours
- Yields: 16 Bars
Data Insight: The structural integrity of this bar depends on temperature. The peanut butter filling has a melting point of roughly 90°F. If you spread it onto a warm brownie, the butter will separate, turning your middle layer into an oily soup. The base must be completely cool.
Step-by-Step Instructions
Step 1: Bake the Base
Preheat oven to 350°F (175°C). Grease a 9×9 inch square pan and line it with parchment paper, leaving an overhang on the sides (this is a “sling” to lift the bars out later).
- In a medium bowl, whisk the melted butter and sugar vigorously.
- Beat in the eggs and vanilla.
- Stir in the cocoa powder, flour, and salt until just combined.
- Pour into the prepared pan.
- Bake for 20–25 minutes until a toothpick comes out with moist crumbs (not wet batter).
- Crucial: Let the brownie layer cool completely in the pan. (Put it in the fridge to speed this up).
Step 2: The Peanut Butter Dough
- In a large bowl (or stand mixer), beat the peanut butter, softened butter, and vanilla until creamy.
- Gradually add the powdered sugar, about ½ cup at a time.
- Texture Check: The mixture should look like crumbly dough but hold together when pinched. If it’s too sticky, add more sugar.
- Press: Dump the dough onto the cooled brownie layer. Use your hands or an offset spatula to press it into a smooth, even, flat layer.
Step 3: The Ganache Topping
- Place the chocolate chips in a heat-proof bowl.
- Heat the heavy cream (or butter) in the microwave until it just starts to bubble (about 45 seconds).
- Pour the hot cream over the chocolate. Let it sit for 5 minutes.
- Whisk gently starting from the center until smooth and glossy.
- Pour the liquid chocolate over the peanut butter layer. Tilt the pan to coat the corners.
Step 4: The Set
- Refrigerate the pan for at least 1 hour to let the chocolate and peanut butter set firmly.
Step 5: The Slice
- Lift the bars out of the pan using the parchment paper sling.
- Use a sharp knife to cut into 16 squares.
- Clean Cuts Tip: Wipe the knife with a warm, damp cloth between cuts to keep the layers distinct.
Nutritional Information
A heavy hitter. Below is the estimated breakdown per bar.
| Nutrient | Amount per Serving | % Daily Value* |
| Calories | 390 kcal | 20% |
| Total Fat | 24g | 37% |
| Saturated Fat | 10g | 50% |
| Carbohydrates | 42g | 15% |
| Sugars | 34g | – |
| Protein | 6g | 12% |
Variations for the Recipe
- No-Bake Base: Swap the brownie layer for a graham cracker crust (Graham crumbs + butter + sugar) for a completely no-bake summer version.
- Crunchy Buckeye: Stir ½ cup of Rice Krispies into the peanut butter layer for a texture pop.
- Salted Caramel: Drizzle salted caramel sauce over the peanut butter layer before adding the chocolate.
- Pretzel Topped: Press mini pretzels into the wet chocolate topping for a sweet & salty crunch.
Serving Suggestions
- Temperature: These are best served slightly chilled or at room temperature. If they get too warm, the layers can slide.
- The Drink: Coffee is essential to cut the extreme sweetness.
Common Mistakes to Avoid
- Rushing the Cooling:
- The Issue: Spreading PB on warm brownies.
- The Result: The peanut butter melts and creates a greasy interface that slides apart when cut.
- The Fix: Touch the brownie pan bottom. If it’s warm, wait.
- Using Natural PB:
- The Issue: Oil separation.
- The Result: The middle layer weeps oil and never sets.
- The Fix: Use standard creamy peanut butter (Jif, Skippy, etc.).
- Cracking Chocolate:
- The Issue: Cutting the bars when they are frozen solid.
- The Fix: Let the pan sit on the counter for 10 minutes before slicing, or use a hot knife.
Storing Tips for the Recipe
- Refrigeration: Store in an airtight container in the fridge for up to 1 week. (Recommended).
- Freezing: Wrap individual bars in plastic wrap and freeze for up to 3 months. Thaw on the counter for 20 minutes before eating.
Conclusion
Stacked Buckeye Bars are the ultimate crowd-pleaser. They combine the homemade comfort of a brownie with the professional finish of a layered confection. Visually, the dark-light-dark stratification looks impressive on a dessert tray, but only you need to know how easy they were to assemble.
Ready to stack? Grab the peanut butter! If you try this recipe, please leave a star rating below and let us know: did you use a brownie mix or make it from scratch? Don’t forget to subscribe to our newsletter for more chocolate-peanut butter combos.
FAQs
Q: Can I double this recipe?
A: Yes. Use a 9×13 inch pan. The baking time for the brownie layer will likely stay similar, perhaps adding 2–3 minutes.
Q: Why is my peanut butter layer crumbly?
A: You likely added too much powdered sugar or didn’t use enough butter. Add a teaspoon of milk and mix again to bring it together.
Q: Is this gluten-free?
A: Only if you use a Gluten-Free brownie mix (or GF flour in the homemade base). The filling and topping are naturally gluten-free.