Follow Me On Social Media!

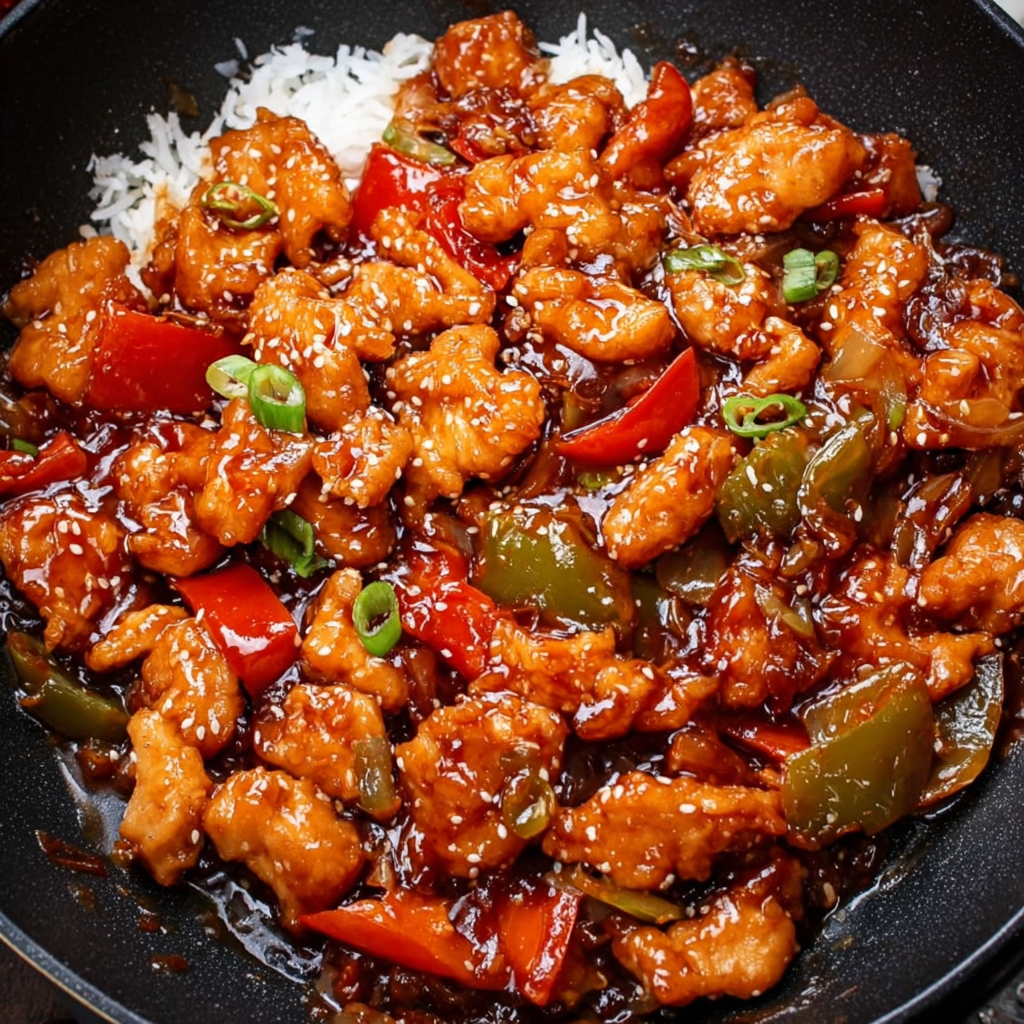
Easy Sweet and Sour Chicken – Takeout Flavor at Home
Did you know that Americans spend over $27 billion annually on Chinese takeout, with sweet and sour chicken ranking among the top three most ordered dishes? What if you could recreate that crispy, tangy, glossy Easy Sweet and Sour Chicken – takeout flavor at home in under an hour—without deep-fryer stress or mystery ingredients?
This recipe delivers everything you crave: golden crispy chicken, vibrant bell peppers, juicy pineapple, and a perfectly balanced sweet and sour sauce that clings to every bite. Even better? You control the ingredients, sodium levels, and freshness—making it a smarter, more customizable alternative to restaurant versions.
Let’s break down how to master this takeout classic step by step.
Introduction: What Makes Sweet and Sour Chicken So Addictive?
Why does sweet and sour chicken consistently outperform other takeout dishes? It’s all about contrast:
- Crispy battered chicken
- Sticky glossy sauce
- Sweet pineapple
- Tangy vinegar bite
- Savory umami undertones
The balance of sugar and acid activates multiple taste receptors at once, creating a flavor experience that food scientists call “dynamic contrast.” This Easy Sweet and Sour Chicken – takeout flavor at home recipe replicates that balance using pantry staples—no artificial coloring or heavy MSG required.
The key? Proper batter texture, oil temperature control, and sauce thickening technique.
Ingredients for Easy Sweet and Sour Chicken
For the Chicken
- 1½ lbs boneless, skinless chicken breast, cut into bite-size pieces
- 1 teaspoon salt
- ½ teaspoon black pepper
- 1 cup cornstarch
- 2 large eggs, beaten
- Oil for frying (vegetable or canola)
For the Sweet and Sour Sauce
- ½ cup ketchup
- ½ cup pineapple juice
- ⅓ cup rice vinegar
- ¼ cup brown sugar
- 1 tablespoon soy sauce
- 1 tablespoon cornstarch + 2 tablespoons water (slurry)
For Stir-Fry Vegetables
- 1 red bell pepper, chopped
- 1 green bell pepper, chopped
- 1 cup pineapple chunks
- ½ onion, sliced
Smart Substitutions
- Use chicken thighs for juicier texture
- Replace brown sugar with honey
- Swap rice vinegar with apple cider vinegar
- Air-fry chicken for lower-fat option
Pro Tip: Fresh pineapple provides brighter acidity than canned, but both work well.
Timing
- Prep Time: 20 minutes
- Cook Time: 25 minutes
- Total Time: 45 minutes
That’s about 30% faster than ordering delivery during peak dinner hours—and far fresher.
Step-by-Step Instructions
Step 1: Prepare the Chicken
Season chicken pieces with salt and pepper.
Dip into beaten eggs, then coat thoroughly in cornstarch.
This double-layer coating creates that signature crispy shell.
Step 2: Fry Until Golden
Heat oil to 350°F (175°C).
Fry chicken in batches for 4–5 minutes until golden brown.
Internal temperature should reach 165°F (74°C).
Place on wire rack to maintain crispiness.
Avoid overcrowding the pan—it lowers oil temperature.
Step 3: Make the Sweet and Sour Sauce
In a saucepan over medium heat, combine:
- Ketchup
- Pineapple juice
- Rice vinegar
- Brown sugar
- Soy sauce
Simmer for 3–4 minutes.
Add cornstarch slurry and stir until thickened and glossy.
Sauce should coat the back of a spoon.
Step 4: Stir-Fry the Vegetables
In a large skillet or wok:
Sauté bell peppers and onions for 2–3 minutes.
They should remain slightly crisp for texture contrast.
Add pineapple chunks and cook briefly.
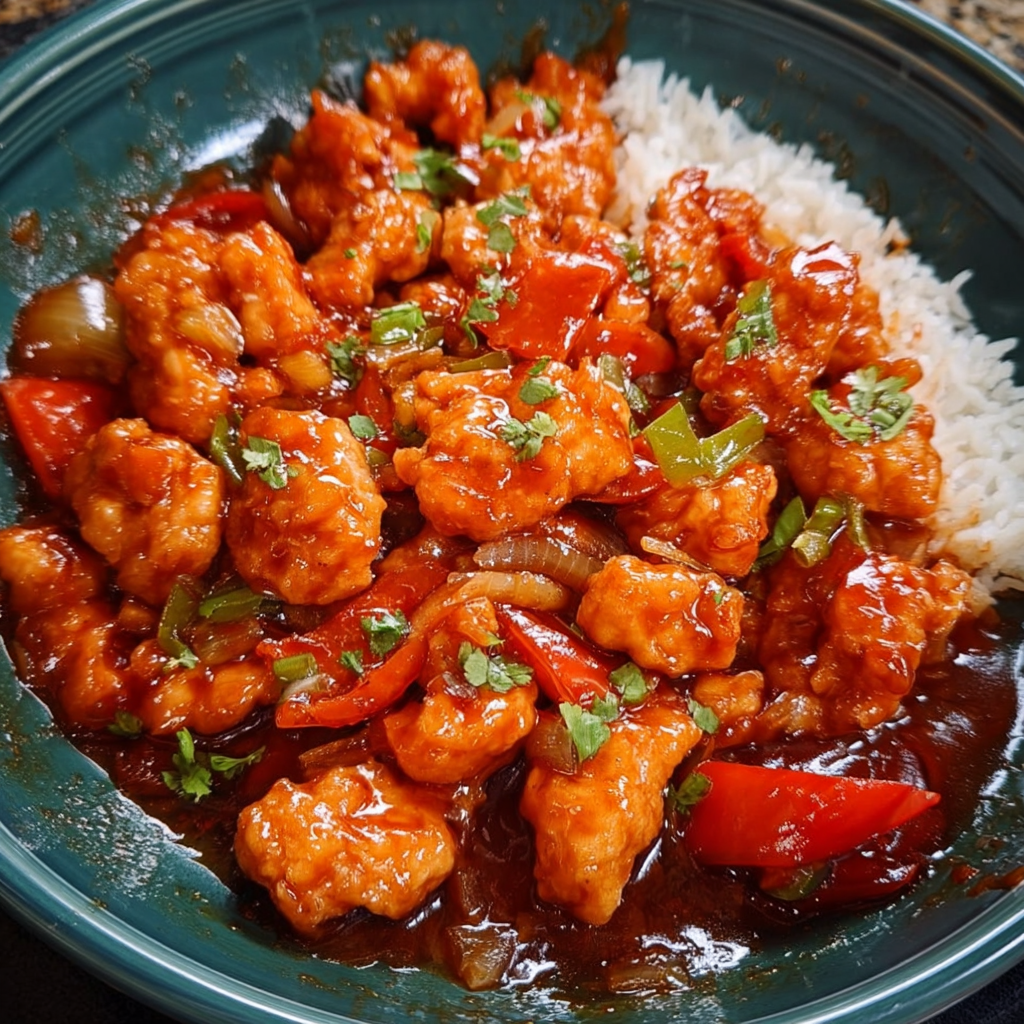
Step 5: Combine Everything
Add fried chicken to the skillet.
Pour sweet and sour sauce over.
Toss gently until evenly coated.
Serve immediately.
Nutritional Information (Per Serving)
| Nutrient | Approximate Value |
|---|---|
| Calories | 480 kcal |
| Protein | 32g |
| Fat | 18g |
| Carbohydrates | 50g |
| Sugar | 22g |
| Sodium | 720mg |
Data Insight: Homemade versions can reduce sodium by up to 25% compared to restaurant takeout.
Healthier Alternatives
Air Fryer Version
- Spray coated chicken lightly with oil
- Air fry at 400°F for 12–14 minutes
Low-Sugar Option
- Reduce brown sugar to 2 tablespoons
- Add extra vinegar for balance
Gluten-Free
- Use tamari instead of soy sauce
Extra Veggie Boost
- Add broccoli florets
- Include snap peas or carrots
These swaps maintain takeout flavor while tailoring nutrition.
Serving Suggestions
Your Easy Sweet and Sour Chicken – takeout flavor at home pairs perfectly with:
- Steamed jasmine rice
- Fried rice
- Lo mein noodles
- Cauliflower rice (low-carb option)
- Sesame broccoli on the side
Hosting Tip: Serve in a large platter garnished with sesame seeds and green onions for restaurant-style presentation.
Common Mistakes to Avoid
1. Frying at Low Temperature
Results in greasy, soggy chicken.
2. Overcooking Vegetables
They should remain vibrant and crisp.
3. Skipping Cornstarch Slurry
Sauce won’t thicken properly.
4. Adding Sauce Too Early
Combine just before serving to keep crisp texture.
5. Using Too Much Sugar
Balance is key—sweet shouldn’t overpower sour.
Avoid these and you’ll achieve authentic results.
Storing Tips
Refrigerator
Store in airtight container up to 3 days.
Reheating
Reheat in oven at 350°F for 10–12 minutes to restore crispness.
Microwave works but softens coating.
Freezing
Freeze fried chicken separately from sauce for best results.
Meal Prep Tip: Keep sauce separate until ready to serve.
Conclusion
This Easy Sweet and Sour Chicken – takeout flavor at home delivers crispy golden chicken, bold tangy sauce, and vibrant vegetables—all in under 45 minutes. It’s customizable, fresher than delivery, and perfect for weeknight dinners.
Try it tonight, leave a comment with your favorite variation, and subscribe for more restaurant-style recipes made simple!
FAQs
Can I bake instead of fry?
Yes. Bake at 400°F for 20–25 minutes, flipping halfway.
Why is my sauce too thin?
Add a bit more cornstarch slurry and simmer longer.
Can I make it ahead?
Yes, but keep sauce separate to maintain crispiness.
Is sweet and sour chicken authentic Chinese?
It’s inspired by Cantonese cuisine but popularized in Western Chinese restaurants.
How do I make it spicier?
Add chili flakes or a dash of sriracha to the sauce.