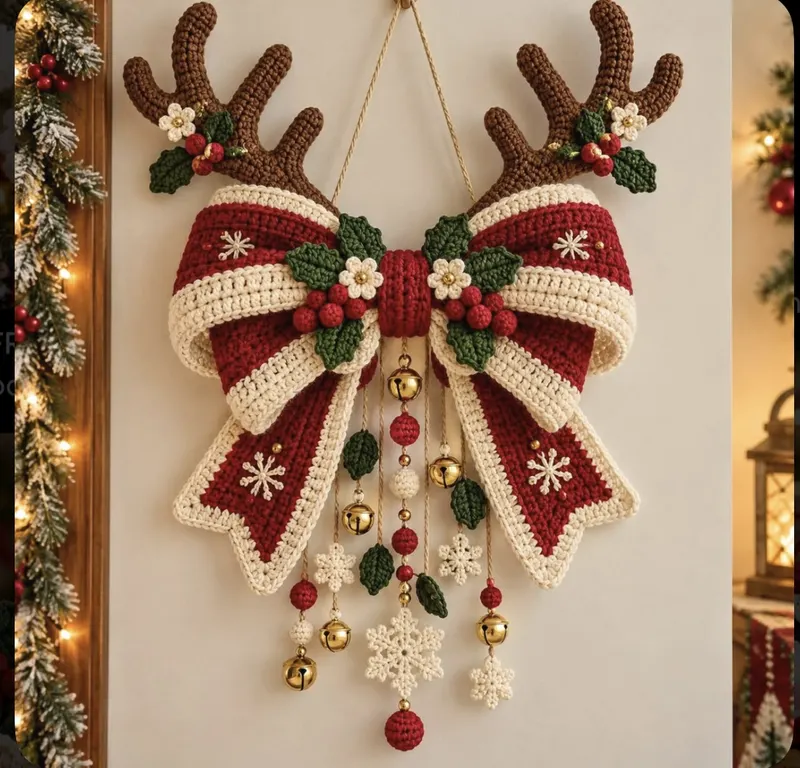
- Time needed
- 3 hrs
- Made this
- 0 crocheters
- Skill level
- Easy
- Hook size
- 3.5 mm
- Finished size
- Approx. 5.5 in (14 cm) wide and 10 in (25 cm) long including antlers and dangles
On this page
- Skill level
Easy
Simple stitches with a little shaping or colour change.
- Time
3 hrs
An average pace, including assembly.
- Use
Ornament and Gift Topper
Approx. 5.5 in (14 cm) wide and 10 in (25 cm) long including antlers and dangles
Why you'll love it
- One striped strip folds into both bow loops.
- A single tail strip makes both V-notched tails.
- Flat antlers are quick slip stitch cords with no stuffing.
- It uses small amounts of yarn, so it is perfect for scraps.
- It works as a tree ornament, gift topper, or wreath accent.
Materials needed
Tools
- 3.5 mm (US E-4) crochet hook
- Tapestry needle
- Scissors
- Two brown pipe cleaners
- Two 10 mm gold jingle bells
- 8 in (20 cm) of gold cord or twine for hanging
- Optional: spray starch or fabric stiffener
Gauge & finished measurements
Gauge: 18 hdc and 14 rows = 4 in (10 cm) in DK yarn with a 3.5 mm hook. Exact gauge is not critical for this ornament.
Row counter
Row 0
Tap the circle after each row
The pattern
Bow Strip
Tails and Knot
Flat Antlers (make 4 pieces)
Holly, Flowers and Dangles
Assembly
- 1
Fold the tail strip in half and place the fold behind the center of the figure-eight bow so both tails hang down at an angle.
- 2
Wrap the knot strip around the center of the bow and tails, and sew its ends together at the back.
- 3
Sew the two antlers to the back of the knot so they rise above the bow loops, angled outward.
- 4
Sew 3 holly leaves, 3 berries, and 1 flower on each side of the knot. Add the remaining 3 berries near the antlers.
- 5
Sew the three dangle cords to the back of the knot, with the long cord in the center.
- 6
Thread the gold cord through the back of the knot and tie it into a hanging loop. Lightly starch the loops if you want them to hold a crisp shape.
Important notes
- Tip: This is an original pattern inspired by the photo. Hidden details are interpreted from the image, and the pattern has not been physically test-crocheted.
- Tip: Abbreviations (US terms): ch = chain, sc = single crochet, hdc = half double crochet, dc = double crochet, sl st = slip stitch, MR = magic ring, dec = decrease.
- Tip: Flat pieces are worked in turned rows; the turning ch 1 or ch 2 does not count as a stitch.
- Tip: Safety: bells and pipe cleaners are not suitable for young children or pets. Hang the ornament out of their reach.
Pattern FAQ
How does one strip make both bow loops?
The strip is sewn into a ring, flattened, and wrapped tightly at the center. This pinches it into a figure-eight, giving two matching loops.
Can I use it as a gift topper?
Yes. Skip the hanging cord and tie the bow onto the gift ribbon through the back of the knot. Leave off the bells if the gift is for a young child.
Can I make the antlers without pipe cleaners?
Yes. Starch the two flat layers together instead. They will be a little softer but still hold their shape.
How do I store it?
Store it flat in a small box with tissue inside the loops so they keep their shape.
Ratings & reviews
No reviews yet. Made it? Be the first to share how it went.
I made this!
Finished your Mini Reindeer Bow Ornament? Share a photo and it may be featured in our Made-by-You gallery.
Reindeer Bow Ornament Crochet Pattern, © 2026 Mandy’s Crochet Studio. Source: https://mandyshealthylife.com/patterns/mini-reindeer-bow-christmas-ornament-gift-topper-crochet-pattern/. Please do not redistribute this pattern.