- Time needed
- 8 hrs
- Made this
- 0 crocheters
- Skill level
- Easy
- Yarn weight
- Worsted
- Hook size
- 4.5 mm
- Finished size
- About 4.75" (12 cm) wide and 24" (61 cm) tall from the top of the hanging loop to the base, plus the bottom ring
On this page
- Skill level
Easy
Simple stitches with a little shaping or colour change.
- Time
8 hrs
An average pace, including assembly.
- Use
About 4.75" (12 cm) wide and 24" (61 cm) tall from the top of the hanging loop to the base, plus the bottom ring
About this pattern
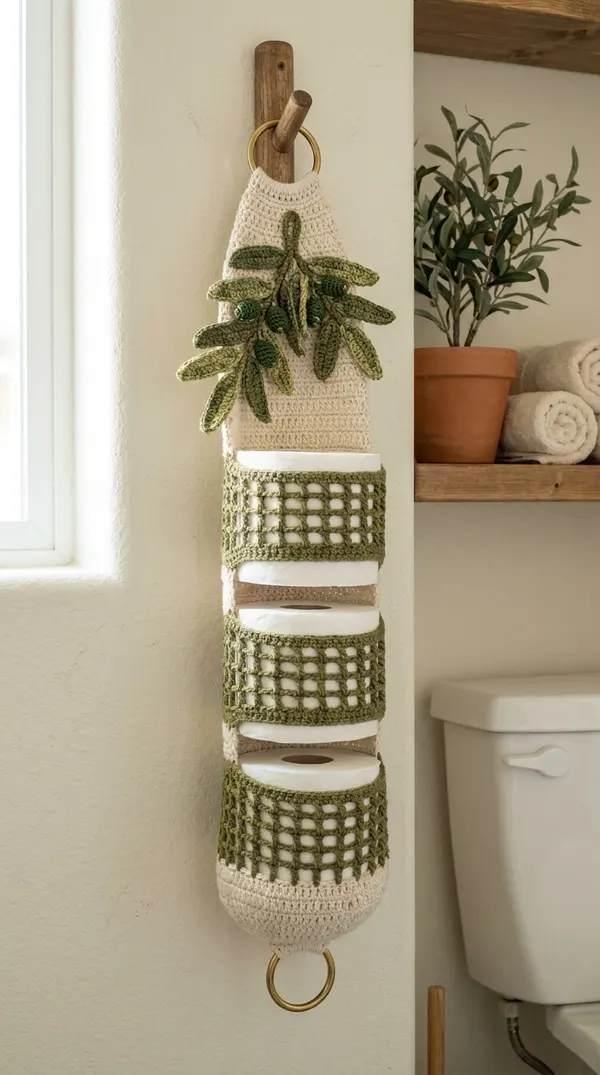
This crochet toilet paper holder pattern turns everyday storage into a little piece of Mediterranean charm. A soft cream panel hangs from a brass ring, three sage-green mesh bands hold your spare rolls, and a sprig of olive leaves and berries crowns the top. It's a quick weekend make that uses less than three balls of cotton. Hang it beside the toilet, on the back of a door or from a towel hook. It also makes a thoughtful housewarming gift that people actually use.
Skill level: Easy. You'll work a flat circle, simple mesh, hdc rows and small appliqués. If you've made a basket or a coaster, you're ready.
Common mistakes & how to fix them
- Fit bigger rolls
- For mega or jumbo rolls, add one round after Rnd 10: *sc in next 9 sts, inc; rep from * around [66 sc]. Work Rnds 11 to 24 over 66 sts (the mesh rounds give 33 dc). Start the panel 10 sts to the right of the join and work 20 hdc, and start each band with ch 38 (37 sc, 19 dc).
- Keep the base flat and the walls straight
- If the circle cups, your increases are too tight; go up half a hook size for Rnds 1 to 10 only. If the circle ruffles, go down half a size. Working Rnd 11 in back loops is what makes the crisp fold into the walls, so don't skip it.
- Make clean color changes and seams
- Finish the last sl st of Rnd 17 with Color B so no cream bump shows in the green. Line up all the round joins at the center back, behind the panel, where they're hidden. When sewing the bands, match Color B yarn to the bands and sew through the post of each hdc row-end for a firm hold.
Materials needed
Yarn
- Yarn: Worsted weightWorsted weight · A: Cream or natural: Base, back panel, ring tab · 110 yd (100 m)
Tools
- Crochet hook: 4.5 mm (US 7). Use a tighter hook than the yarn label suggests, so the base is firm.
- 2 metal rings, 1.5" to 2" (4 to 5 cm) across, brass or gold (macramé or craft rings)
- Tapestry (yarn) needle
- Stitch markers (at least 3)
- Scissors
- Measuring tape
- Small amount of fiberfill or yarn scraps (to plump the olives)
- Sewing pins
- A sturdy wall hook, peg or over-the-door hook for hanging
Gauge & finished measurements
Gauge: Gauge matters for the base, because it has to fit your rolls. It matters less for the leaves and olives. 16 sc and 18 rows = 4" (10 cm) with a 4.5 mm hook. 15 hdc and 11 rows = 4" (10 cm) with a 4.5 mm hook. Quick check: After Rnd 10, the base circle measures about 4.75" (12 cm) across.
| Finished size | About 4.75" (12 cm) wide and 24" (61 cm) tall from the top of the hanging loop to the base, plus the bottom ring. The… |
|---|---|
| Holds | 3 standard rolls, stacked. |
| Estimated time | 6 to 8 hours (about 4 hours for the holder and 2 to 4 hours for the olive branch). |
Row counter
Row 0
Tap the circle after each row
The pattern
Part 1: Base cup (worked in joined rounds)
The holder has four parts: a base cup that holds the bottom roll, a back panel worked up from the cup, two loose mesh bands for the upper rolls, and an olive branch. Stitch counts are in brackets at the end of each round or row.
Part 2: Back panel (worked in rows from the cup)
Flatten the cup so the round joins line up at the center back. With the outside of the back facing you, count 9 sts to the right of the join and place a marker in the 9th st.
Info: Fasten off, leaving a 12" (30 cm) tail for sewing.
Part 3: Mesh bands (make 2 in Color B)
Info: Fasten off, leaving a 12" (30 cm) tail. Each band measures about 8.75" x 3" (22 x 7.5 cm).
Part 4: Olive branch
Info: Olives (make 5, Color C):
Info: Push in a pinch of fiberfill or yarn scraps before closing. Fasten off, thread the tail through the front loops of the last 6 sts and pull closed, leaving a 6" tail for sewing.
Assembly
- 1
Sew the olive branch on while the panel is still flat. It's much easier than sewing it after the bands are on.
- 2
Arrange the olive branch. Lay the panel flat, outside up. Pin the main stem down the center of the top section, from Row 40 down to about Row 27, tilting it slightly. Pin the two side stems so they branch out from the middle of the main stem toward each side. Sew all stems down with their tails.
- 3
Add the leaves and olives. Pin 6 leaves in pairs along the main stem, with one pointing up at the tip, and 2 leaves on each side stem. Let the outer leaves hang past the panel edges for a natural look. Sew each leaf down along its center only, so the edges lift slightly. Cluster the 5 olives where the stems meet and sew them on.
- 4
Attach the mesh bands. Sew the short ends of Band 1 to the side edges of the panel, from Row 3 up to Row 10, so the band curves toward the front. Sew Band 2 the same way, from Row 15 up to Row 22. Keep the same side of each band facing out.
- 5
Add the top ring. Pass the strap through a ring from front to back, fold it down behind the panel, and whip stitch Row 59 to the back of Row 45.
- 6
Make the bottom ring tab (Color A). Ch 5. Row 1: Sc in 2nd ch from hook and in each ch across. [4 sc] Rows 2 to 10: Ch 1, turn, sc in each st across. [4 sc] Fasten off with a long tail. Fold the tab over the second ring and sew both ends to the center of the base underside.
- 7
Weave in all ends.
- 8
Hang and load. Hang the holder on a sturdy hook. Drop a roll in from the front, just above Band 2. Push it down through both bands into the base cup, then add the next two rolls the same way.
Important notes
- Tip: One standard 100 g ball of each color is plenty.
- Tip: Abbreviations (US terms): MR = magic ring, ch = chain, sl st = slip stitch, sc = single crochet, hdc = half double crochet, dc = double crochet, inc = 2 sc in the same st, sc2tog = single crochet 2 together (decrease), hdc2tog = half double crochet 2 together (decrease), BLO = back loop only, st(s) = stitch(es), sp(s) = space(s), sk = skip, beg = beginning, rep = repeat, Rnd(s) / Row(s) = round(s) / row(s), RS = right side.
- Tip: Hdc2tog: Yo, insert hook in next st, pull up a loop. Yo, insert hook in next st, pull up a loop (5 loops on hook). Yo and draw through all 5 loops.
- Tip: Color change: Work the last sl st of the old round with the new color, so the change is clean.
- Tip: Joined rounds: At the start of each sc round, ch 1 (doesn't count) and work the first sc in the same st. Join with a sl st in the first sc.
- Tip: Washing: Hand wash in lukewarm water with a little mild detergent, gently squeezing rather than rubbing so the leaves stay neat. Rinse well and press out water with a towel. If you machine wash, use a cold, gentle cycle inside a mesh laundry bag. The metal rings can scuff the drum, so hand washing is better.
- Tip: Drying: Pat the rings dry right away to prevent tarnish or water marks. Lay the holder flat on a towel and shape the base into a circle. Stuff it with a dry towel or a toilet roll in a plastic bag while it dries, so the cup keeps its shape. Don't tumble dry.
- Tip: Blocking: Before assembly, wet block the panel and the two bands. Pin the panel straight, and pin each band to 8.75" x 3" (22 x 7.5 cm) so the mesh holes open up evenly. Pin each leaf flat to a point. Let everything dry completely.
- Tip: Bathroom tip: Hang the holder away from the shower spray so it dries between uses, and wash it every few weeks.
- Tip: Yarn: Worsted weight (#4 Medium) cotton or a cotton blend. Cotton is firm, holds its shape under the rolls, and copes well with bathroom humidity and frequent washing.
- Tip: Yarn amounts: A: Cream or natural: Base, back panel, ring tab · 110 yd (100 m); B: Sage or olive green: Mesh bands, leaves, stems · 80 yd (73 m); C: Dark olive or forest green: Olives · 15 yd (14 m).
- Tip: Finished size: About 4.75" (12 cm) wide and 24" (61 cm) tall from the top of the hanging loop to the base, plus the bottom ring. The base fits a standard toilet roll up to about 4.75" (12 cm) across.
- Tip: Gauge: Before going on, set a toilet roll on the finished base circle. It should sit inside the edge with a little room to spare. If it's too small, add one more increase round (see Maker Tips).
Pattern FAQ
Will mega or jumbo toilet rolls fit?
The standard pattern fits rolls up to about 4.75" (12 cm) across. For larger rolls, add one increase round to the base and work a few extra stitches in the panel and bands, as explained in Maker Tips. Always test the base with your own roll before starting the walls.
What is the best yarn for crochet bathroom decor?
Cotton or a cotton blend is best. It's strong, holds its shape, handles humidity and can be washed often. Acrylic works too but can stretch, and wool is best avoided in a damp bathroom.
How do you hang a crochet toilet paper holder?
Use a sturdy wall hook, peg rail or adhesive hook rated for at least 2 lb (1 kg), or hang it from a towel bar or over-the-door hook. The top ring takes the weight, so screw-in hooks are the most secure choice.
Can I make the holder taller to store 4 rolls?
Yes. Work the panel rows to Row 52 instead of Row 40 (12 rows per extra roll), and make a third mesh band. Sew it from Row 27 to Row 34. Place the olive branch between Rows 39 and 52, then work the taper and strap as written. You'll need about 30 extra yards of Color A and 15 extra yards of Color B.
Ratings & reviews
No reviews yet. Made it? Be the first to share how it went.
I made this!
Finished your Olive Branch Toilet Paper Holder? Share a photo and it may be featured in our Made-by-You gallery.
Olive Branch Crochet Toilet Paper Holder Pattern (Free Hanging 3-Roll Storage), © 2026 Mandy’s Crochet Studio. Source: https://mandyshealthylife.com/patterns/olive-branch-crochet-toilet-paper-holder-pattern-free-hanging-3-roll-storage/. Please do not redistribute this pattern.