- Time needed
- 16 hrs
- Made this
- 0 crocheters
- Skill level
- Intermediate
- Hook size
- 4 mm
- Finished size
- Approx. 14 in (36 cm) tall including the ring; base approx. 6.25 in (16 cm) square
On this page
- Skill level
Intermediate
Comfortable with shaping, joining and reading counts.
- Time
16 hrs
An average pace, including assembly.
- Use
Glowing Holiday Display
Approx. 14 in (36 cm) tall including the ring; base approx. 6.25 in (16 cm) square
Why you'll love it
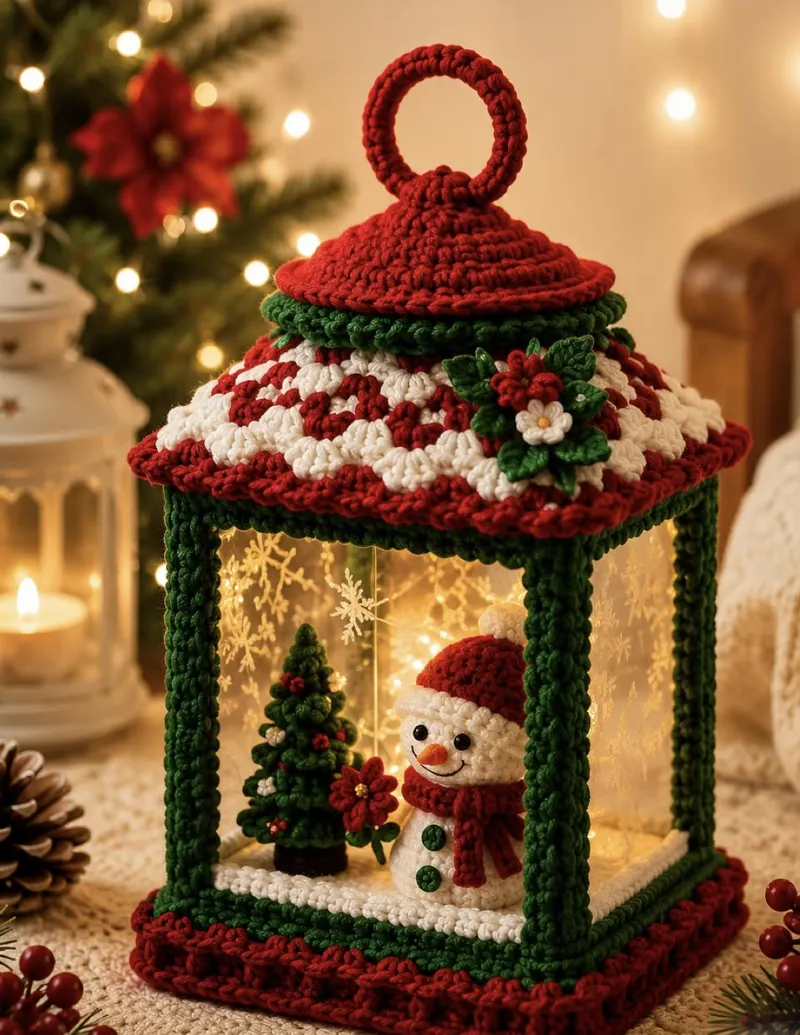
- Warm LED lights make the snowy scene inside glow like a real lantern.
- A foam base, dowel pillars, and cardboard roof keep it sturdy and straight.
- The red and white roof rows and green pillars give a classic Christmas palette.
- The mini snowman, tree, and poinsettia are quick, fun amigurumi pieces.
- You can change the scene inside each year for a fresh display.
Materials needed
Tools
- 4.0 mm (US G-6) crochet hook
- Tapestry needle
- Scissors
- Stitch markers
- Craft foam block, 5.75 x 5.75 x 1.25 in (14.5 x 14.5 x 3 cm)
- Four wooden dowels, 3/8 in (1 cm) thick and 8 in (20 cm) long, plus thin batting strips
- Foam board, 1/2 in (1.2 cm) thick, cut to 5.25 in (13.5 cm) square for the ceiling
- Stiff cardboard for the roof pyramid and tape
- Clear acetate or PVC sheet, about 19 x 6.5 in (48 x 16.5 cm), and white snowflake stickers or a white paint pen
- Battery-operated warm white LED fairy lights, ideally with a timer
- One 2.5 in (6.5 cm) plastic ring
- Polyester fiberfill, a hot glue gun, and craft glue
Gauge & finished measurements
Gauge: 18 sc and 20 rows = 4 in (10 cm) in worsted yarn with a 4.0 mm hook. Square gauge: Rounds 1-13 of the base square measure about 5.8 in (14.5 cm) per side.
Row counter
Row 0
Tap the circle after each row
The pattern
Lantern Base
Pillars (make 4)
Ceiling Panel
Roof Panels (make 4)
Roof Top
Mini Snowman
Mini Tree and Flowers
Assembly
- 1
Scene: arrange the snowman, tree (glued on its trunk), and inside poinsettia on the snowy floor, keeping them at least 1 in (2.5 cm) from the edges. Sew or glue them in place.
- 2
Lights: wind the LED fairy lights loosely around the scene and up one back corner. Tuck the battery pack behind the tree or snowman so the switch is easy to reach.
- 3
Pillars: mark the 4 corner positions on the snowy floor, about 0.5 in (1.2 cm) in from each edge. Push the bare 1 in end of each covered dowel straight down through the floor into the foam, adding a drop of glue.
- 4
Windows: decorate the acetate sheet with snowflake stickers or paint. Score and fold it into a square tube to fit just inside the pillars, overlapping the ends by 0.5 in. Slip it into place around the scene and glue its edges to the pillars.
- 5
Ceiling: center the ceiling panel over the pillars and press the bare 0.5 in dowel tips into the foam board through the crochet. Glue in place.
- 6
Roof: slide the cardboard pyramid into the crochet roof. Glue the roof centered on the ceiling so the scalloped trim overhangs on all sides.
- 7
Top: slip the green collar over the roof tip, then sew or glue the dome cap on top. Sew the hanging ring to the center of the cap.
- 8
Roof flowers: sew or glue the second poinsettia, the white flower, and 3 leaves to one front corner of the roof.
Important notes
- Tip: This is an original pattern inspired by the photo. Hidden construction details, yarn weight, and dimensions are interpreted from the image, and the pattern has not been physically test-crocheted.
- Tip: Abbreviations (US terms): ch = chain, sc = single crochet, hdc = half double crochet, dc = double crochet, sl st = slip stitch, MR = magic ring, BLO = back loop only, dec = decrease (invisible single crochet decrease).
- Tip: Square pieces are worked in joined rounds; the ch 1 at the start of each round does not count as a stitch. Pillars and small amigurumi are worked in continuous rounds with a marker. Roof panels are worked in rows.
- Tip: Fire safety: use only battery-operated LED lights. Never place a candle or any open flame inside or near the lantern.
- Tip: This is a decoration, not a toy. The dowels, foam, batteries, and small parts are not suitable for young children or pets.
Pattern FAQ
Can I hang the lantern by its ring?
The foam base makes it fairly heavy, so it is best displayed on a surface. For a hanging version, use foam board for the base instead of a foam block, and glue the dowels firmly at both ends.
Can I skip the wooden dowels?
You can stuff the pillar tubes firmly with fiberfill around plastic drinking straws or rolled cardboard, but dowels give the strongest, straightest frame.
Where can I find clear sheets for the windows?
Clear acetate, PVC sheet, or the clear plastic from food packaging all work. Look for sheets that are firm enough to stand on their own but easy to fold.
Can I use a store-bought lantern instead?
Yes. Crochet covers for the base, pillars, and roof of a small plastic or wooden lantern, adjusting the stitch counts to fit, and glue them on. Add the scene and lights inside.
How do I clean it?
Because of the frame and lights, do not wash it. Remove dust with a soft brush or a lint roller, and spot clean with a barely damp cloth if needed.
Ratings & reviews
No reviews yet. Made it? Be the first to share how it went.
I made this!
Finished your Christmas Lantern Snow Scene? Share a photo and it may be featured in our Made-by-You gallery.
Christmas Lantern Snowman Crochet Pattern, © 2026 Mandy’s Crochet Studio. Source: https://mandyshealthylife.com/patterns/christmas-lantern-snowman-scene-crochet-pattern/. Please do not redistribute this pattern.