- Time needed
- 14 hrs
- Made this
- 0 crocheters
- Skill level
- Intermediate
- Hook size
- 4 mm
- Finished size
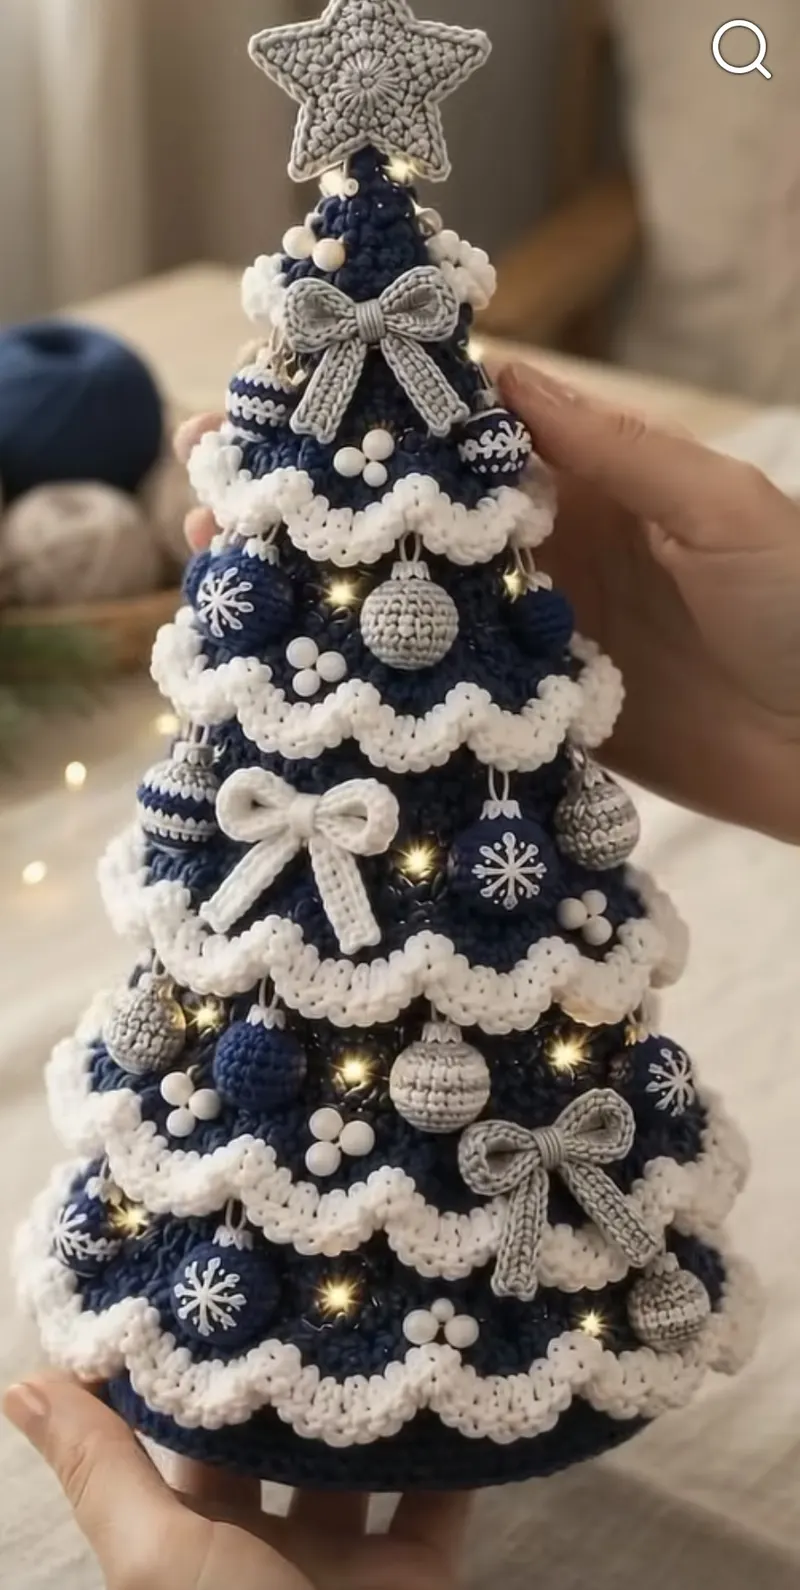
- Approx. 13 in (33 cm) tall including the star and 7.5 in (19 cm) wide at the bottom garland
On this page
- Skill level
Intermediate
Comfortable with shaping, joining and reading counts.
- Time
14 hrs
An average pace, including assembly.
- Use
Christmas Centerpiece
Approx. 13 in (33 cm) tall including the star and 7.5 in (19 cm) wide at the bottom garland
Why you'll love it
- Navy, white, and silver create a calm, elegant winter color scheme.
- Ruffle garlands are worked directly onto the tree, with nothing to sew on.
- Mini amigurumi ornaments make the tree look fully decorated.
- Micro LED lights add a cozy twinkle for evenings.
- A cardboard base keeps the tree stable on a table or shelf.
Materials needed
Tools
- 4.0 mm (US G-6) crochet hook
- Tapestry needle
- Scissors
- Stitch markers
- Polyester fiberfill, approx. 6 oz (170 g)
- A 6.25 in (16 cm) circle of stiff cardboard or plastic canvas for the base
- One wooden skewer, about 5 in (13 cm) long
- Battery-operated micro LED fairy lights on fine wire (about 6 ft / 2 m)
- Twenty-four 10 mm white pearl beads, or white yarn to crochet mini balls
Gauge & finished measurements
Gauge: 18 sc and 20 rounds = 4 in (10 cm) in worsted yarn with a 4.0 mm hook. Base gauge: Rounds 1-15 measure about 6.4 in (16 cm) across. Tight stitches matter more than exact gauge.
Row counter
Row 0
Tap the circle after each row
The pattern
Base
Cone
Ruffle Garlands
Ornaments
Bows (make 3 silver, 1 white)
Star Topper
Assembly
- 1
Lights: starting at the base, wind the micro LED wire around the cone in a loose spiral up to the tip, tucking it just under each garland. Tack the wire in a few places with thread. Hide the battery pack at the back, under the bottom garland.
- 2
Ornaments: sew the 14 balls between the garlands by their cap loops, spacing them around the tree and alternating navy, silver, and striped balls.
- 3
Pearl clusters: sew the 8 clusters into the gaps between the ornaments.
- 4
Bows: sew one silver bow near the top below Garland 7, the white bow in the middle between Garlands 4 and 5, and the other two silver bows lower down on opposite sides.
- 5
Star: push the free end of the skewer straight down through the center of the tip into the stuffing until the star sits just above the cone. Add a dab of glue at the tip if needed.
- 6
Shape the garlands with your fingers so the waves are even all around.
Important notes
- Tip: This is an original pattern inspired by the photo. Hidden construction details, yarn weight, and dimensions are interpreted from the image, and the pattern has not been physically test-crocheted.
- Tip: Abbreviations (US terms): ch = chain, sc = single crochet, hdc = half double crochet, dc = double crochet, sl st = slip stitch, MR = magic ring, BLO = back loop only, dec = decrease (invisible single crochet decrease).
- Tip: The cone and ornaments are worked in continuous rounds with a stitch marker. The garland rounds and star rounds are joined; the ch 1 or ch 2 at the start does not count as a stitch.
- Tip: Use only battery-operated LED lights, and switch them off when the tree is unattended.
- Tip: Safety: the skewer, beads, lights, and small parts are not suitable for young children or pets. This tree is a decoration.
Pattern FAQ
How do I make the tree taller?
Add 1 or 2 plain rounds between each decrease round in the lower half of the cone. Keep every garland on a round with a multiple of 6 stitches so the wave repeat still fits.
Can I skip the lights?
Yes. The tree looks complete without them. You can add extra pearl clusters or small silver stars in the spaces where the lights would twinkle.
Why are my garlands flat instead of ruffled?
Make sure Round A has 2 hdc in every front loop, doubling the stitch count. If they still look flat, work 3 hdc in every other loop for an even fuller ruffle.
Can I use cotton yarn?
Yes. Cotton gives crisper garlands and a firmer cone but less stretch. Acrylic gives softer, bouncier ruffles. Either works with the same stitch counts.
How should I store it?
Remove the batteries and store the tree upright in a box with tissue paper around the garlands and ornaments so they keep their shape.
Ratings & reviews
No reviews yet. Made it? Be the first to share how it went.
I made this!
Finished your Navy Blue Ruffle Christmas Tree? Share a photo and it may be featured in our Made-by-You gallery.
Navy Blue Christmas Tree Crochet Pattern, © 2026 Mandy’s Crochet Studio. Source: https://mandyshealthylife.com/patterns/navy-blue-ruffle-christmas-tree-crochet-pattern/. Please do not redistribute this pattern.