- Time needed
- 12 hrs
- Made this
- 0 crocheters
- Skill level
- Intermediate
- Hook size
- 4 mm
- Finished size
- Approx. 16 in (41 cm) long including stars, without the hanging cord, and 7 in (18 cm) wide
On this page
- Skill level
Intermediate
Comfortable with shaping, joining and reading counts.
- Time
12 hrs
An average pace, including assembly.
- Use
Holiday Wall Hanging
Approx. 16 in (41 cm) long including stars, without the hanging cord, and 7 in (18 cm) wide
Why you'll love it
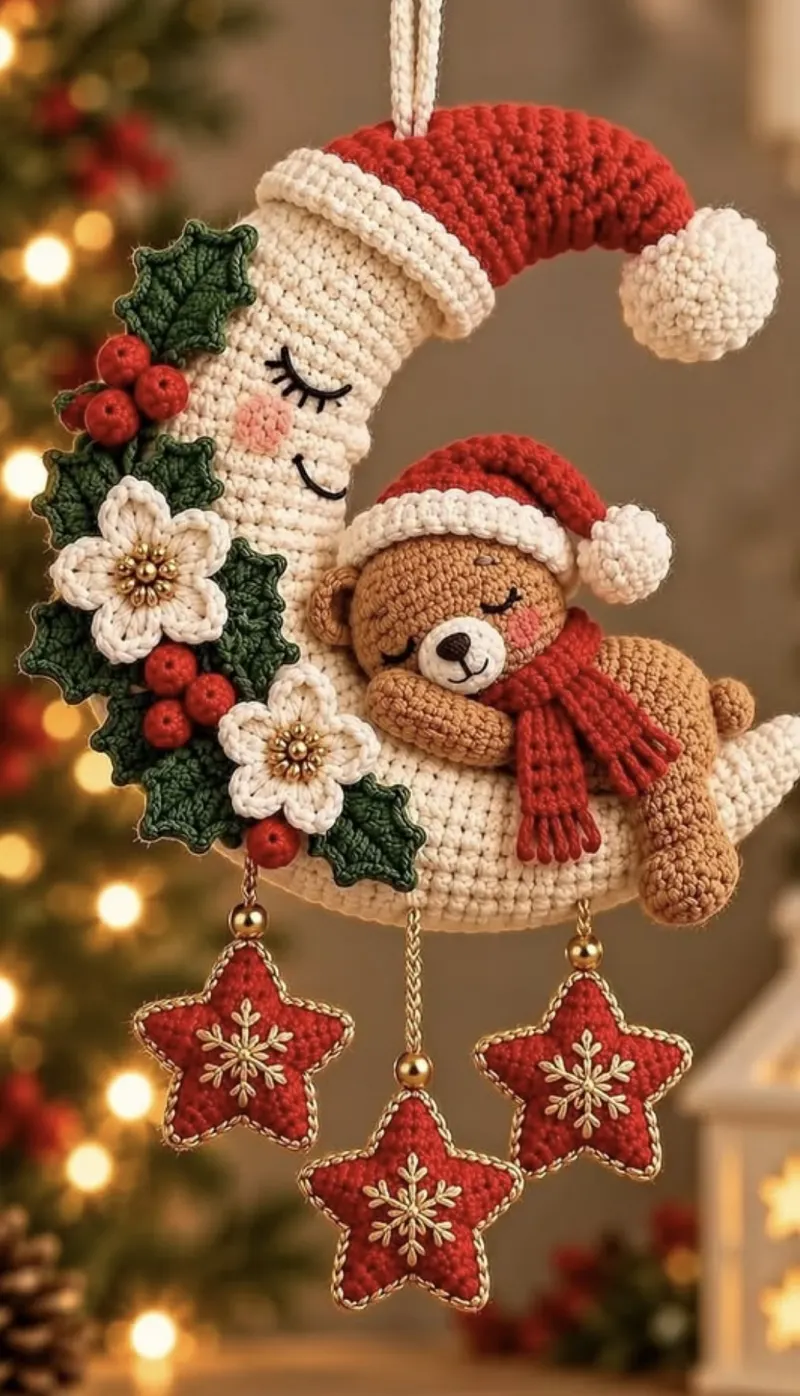
- The moon curves into a crescent on its own, so there is no complex shaping.
- A sleeping bear and a sleepy moon create a sweet, peaceful scene.
- Holly, berries, and gold-centered flowers add a festive garland.
- Padded red stars with gold snowflakes sparkle and sway below.
- It suits a door, a wall, or a nursery during the holidays.
Materials needed
Tools
- 4.0 mm (US G-6) crochet hook
- Tapestry needle and a beading needle
- Scissors
- Stitch markers
- Polyester fiberfill, approx. 3 oz (85 g)
- Fourteen 4 mm gold beads for the flower centers
- Three 10 mm gold beads for the star chains
- Gold sewing thread
Gauge & finished measurements
Gauge: 18 sc and 20 rounds = 4 in (10 cm) in worsted cotton with a 4.0 mm hook. Moon gauge: Round 12 of the moon measures about 2 in (5 cm) across when stuffed. Tight stitches are important so the stuffing does not show.
Row counter
Row 0
Tap the circle after each row
The pattern
Crescent Moon
Santa Hats and Pompoms
Sleeping Bear
Holly, Berries and Flowers
Star Dangles
Assembly
- 1
Face: hold the moon with its inner curve on the right. On the front, embroider a closed curved eye with lashes at about Round 16 near the inner edge, a pink cheek at about Round 19, and a small smile at about Round 22.
- 2
Moon hat: place the hat over the top tip of the moon, with the brim at about Rounds 10-14. Sew around the brim and let the tip flop to the right. Sew on the large pompom.
- 3
Bear: sew the head to one end of the body. Add the muzzle, ears, hat with its small pompom, and scarf. Sew the body along the lower inner curve of the moon with the head resting just below the moon's smile.
- 4
Bear limbs: sew the arms so they cross in front of the chest under the chin. Sew one leg along the body and the other so it dangles over the lower tip of the moon.
- 5
Garland: sew the 6 holly leaves along the outer curve of the moon on the left side. Add the two white flowers and the 9 berries in small clusters between the leaves.
- 6
Stars: sew the three chains to the bottom of the moon, one near the holly on the left, one in the center, and one near the lower tip on the right, so the middle star hangs lowest.
- 7
Hanging cord: with cream, ch 61 and sl st in the back bump of each ch back along it (60 sl st). Fold the cord in half and sew both ends securely to the top of the moon behind the hat.
Important notes
- Tip: This is an original pattern inspired by the photo. Hidden construction details, yarn weight, and dimensions are interpreted from the image, and the pattern has not been physically test-crocheted.
- Tip: Abbreviations (US terms): ch = chain, sc = single crochet, hdc = half double crochet, dc = double crochet, tr = treble crochet, sl st = slip stitch, MR = magic ring, dec = decrease (invisible single crochet decrease).
- Tip: Most pieces are worked in continuous rounds with a stitch marker. Moon Rounds 13-33 and the star rounds are joined; the ch 1 at the start of a joined round does not count as a stitch.
- Tip: Stuff the moon firmly and evenly so it keeps its crescent shape on the wall.
- Tip: Safety: beads and small parts are choking hazards. If you hang it in a nursery, place it well out of a child's reach, or embroider the flower centers instead of using beads.
Pattern FAQ
How does the moon get its crescent shape?
In Rounds 13-32, one half of each round is single crochet and the other half is half double and double crochet. The taller stitches make the outer edge much longer than the inner edge, so the tube curves into a crescent as you work.
My moon is not curving enough. What can I do?
Make sure the dc section is worked on the same side every round by keeping a marker in the first sc of the inner side. For a deeper curve, add 2-4 more curved rounds, or replace the 2 hdc on each side with dc.
Can I use acrylic yarn?
Yes. Acrylic is softer and slightly fuzzier, while cotton gives crisper stitches and cleaner embroidery. Use a tight tension either way so the stuffing does not show.
Can I make it without the Christmas details?
Yes. Leave off the hats, scarf, and holly, and make the stars in yellow or pastel colors for a year-round moon decoration.
How do I clean it?
Spot clean with a damp cloth and mild soap, then let it air dry hanging up. Avoid soaking it, since the beads and stuffing can take a long time to dry.
Ratings & reviews
No reviews yet. Made it? Be the first to share how it went.
I made this!
Finished your Sleeping Bear Moon Wall Hanging? Share a photo and it may be featured in our Made-by-You gallery.
Christmas Moon Wall Hanging Crochet Pattern, © 2026 Mandy’s Crochet Studio. Source: https://mandyshealthylife.com/patterns/christmas-moon-sleeping-bear-wall-hanging-crochet-pattern/. Please do not redistribute this pattern.